Ever wanted to turn those china dishes in your cabinet into something you may ACTUALLY use, but didn’t dare repurpose your grandmother’s coveted china? Well . . . don’t worry, we bought somebody else’s grandmother’s china for you to use during this craft session.
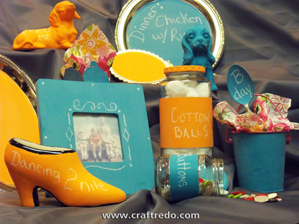
These Serving Towers will be an amazing center piece to your Holiday feast, a fantastically thought-provoking hostess gift or a useful teacher appreciation gift. Many different materials will be offered to choose from: vintage china, glass platters, aluminum serving trays, and more. We will also incorporate a secret repurposed how-to craft that will make gift giving fun, easy and recycle-e this Holiday Season.
craftredo
Craft class is THIS Sunday, October 13th
2:00pm – 4:00pm
Brandon Elementary Art Room (Martin Public School) 1619 University Street; Martin, Michigan 49070.
craftredo
Register no later than THIS Friday 4:00pm, October 11th (we will be shopping for supplies on Saturday).
craftredo
To register, send us an email at: craftredo@aol.com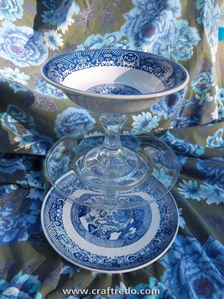
craftredo
Cost for the session is $20 per person. Please bring payment to the craft class. All supplies will be provided by Katie and Korene.
craftredo
Feel free to bring your own treats and drinks. No alcoholic beverages, please.
craftredo
We ask that we keep the session for adults only (no kids please). Teens 13 and up are welcome to attend, but must be accompanied by a paid adult. Feel free to invite friends.
craftredo
Here’s a link for the directions to the school: http://www.martinpublicschools.org/schools/brandonel/directions
craftredo
Enter through the main entrance on the West side of the building (Elementary entrance). Please park in the parking lot – NOT the loop or the student drop off area. Please arrive around or before 2:00, we will be locking the exterior doors (for our safety) a little bit after 2:00.
craftredo
Don’t forget: There will be a table set out if you would like to display a flyer/brochure of what you do. Are you an exercise instructor, product consultant, the head of an organization? Bring a brochure or flyer to display on the table.