craftredo

Just another WordPress.com site

February Craft Class – Valentine String Art January 26, 2014

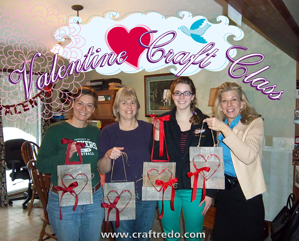
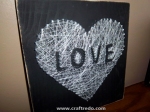
We have a craft planned for our February session that you’ll just love! String art is making a come-back and boy do we have some amazing tips and tricks in helping you create the most wonderful Valentine treat. Crafters will have the opportunity to choose from 2 Valentine themed designs: Love & Heart-N-Home. OR if you’d rather have a more traditional layout, you can choose a Monogram in either Script or Traditional type font.

loveSTRGcraftredo

craftredo

red loveheartNhome

craftredo

craftredo

craftredo

craftredo

craftredo

craftredo

craftredo

craftredo

craftredo

craftredo

craftredo

craftredo

craftredo

craftredo

craftredo

craftredo

If you have a hair dryer, hammer & needle-nose pliers bring ‘em. We’ll have some available, BUT depending upon how many crafters we have sign up . . . well . . . if you have your own, you won’t have to share and/or wait to get craftin’.

craftredo

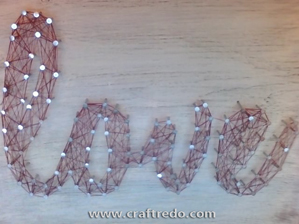
If the complexity of the class concerns you, don’t worry. We had our kids try it out first and they soared! Peek at the photo, that’s why it’s best to bring your own hammer and pliers. The pliers will save your fingers!

holding pliers

craftredo

Craft class is Sunday, February 2nd (Yes, we ARE aware that’s Super Bowl Sunday. You’ll be done before the game starts.)
1:00pm – 4:00pm (*NOTE time difference. We needed a little more time with this craft.)
Class will be held at Brandon Elementary Art Room, (Martin Public School) 1619 University Street; Martin, Michigan 49070.

craftredo

To register, send us an email at: craftredo@aol.com

When you register we need to know:
Your background paint color,
Thread color,
AND
1 design choice:
Love,
Heart-N-Home,
Monogram letter (Be sure to let us know which letter and which type font: Script or Traditional, you would like to use.) If you DO choose the Monogram style, we suggest picking the Traditional style. The Script is a little more advanced. AFTER attending the class you’ll feel confident to tackle the Script.

When selecting your background color and thread color, we suggest choosing contrasting colors. We found that dark backgrounds with light thread work best.

monogram

craftredo

Register by Thursday, January 30th.

craftredo

Cost for the session is $20 per person. Please bring payment to the craft class. All supplies will be provided by Katie and Korene.

craftredo

Feel free to bring your own treats and drinks. No alcoholic beverages, please.

craftredo

We ask that we keep the session for adults only (no kids please). Teens 13 and up are welcome to attend, but must be accompanied by a paid adult. Feel free to invite friends.

craftredo

Here’s a link for the directions to the school: http://www.martinpublicschools.org/schools/brandonel/directions

craftredo

Enter through the main entrance on the West side of the building (Elementary entrance). Please park in the parking lot – NOT the loop or the student drop off area. Please arrive around or before 1:00, we will be locking the exterior doors (for our safety) a little bit after 1:00.

craftredo

Don’t forget: There will be a table set out if you would like to display a flyer/brochure of what YOU do. Are you an exercise instructor, product consultant, the head of an organization? Bring a brochure or flyer to display on the table.

craftredo

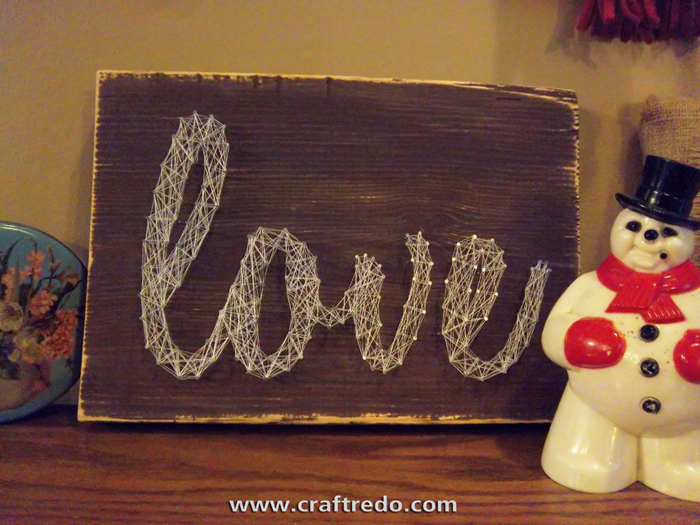
After the craft session, you’ll have the knowledge and skill to create layouts like these:

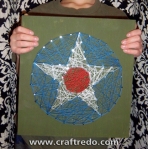
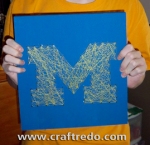
This is a really fun craft. Hope to see you Sunday!


November Craft Class – Ribbon, Pallet Board Art November 9, 2013

GLAMb WEB

We’ll start your Thanksgiving week off right with an upcycled Holiday craft. Crafters will choose from 3 designs: heart, cross or star. Size of finished product will be roughly 9 1/2″ w x 11″h. What a great way to get ONE of your Holiday gifts off your shopping list.

craftredo

If you happen to have a drill, bring it (electric or cordless – if it’s cordless, the drill needs to be fully charged when you bring it to class). We will have some available to use – but if you can bring your own drill, feel free to do so.

VK100_3048

craftredo

Craft class is Sunday, November 24th
2:00pm – 4:00pm
We are planning on holding the class at Brandon Elementary Art Room, (Martin Public School) 1619 University Street; Martin, Michigan 49070, but waiting for the final A-OK from the school. We’ll keep you updated.

craftredo

Register by Thursday, November 21st.

craftredo

To register, send us an email at: craftredo@aol.com

craftredo

Cost for the session is $20 per person. Please bring payment to the craft class. All supplies will be provided by Katie and Korene.

GLAMa WEBcraftredo

Feel free to bring your own treats and drinks. No alcoholic beverages, please.

craftredo

We ask that we keep the session for adults only (no kids please). Teens 13 and up are welcome to attend, but must be accompanied by a paid adult. Feel free to invite friends.

craftredo

Here’s a link for the directions to the school: http://www.martinpublicschools.org/schools/brandonel/directions

craftredo

Enter through the main entrance on the West side of the building (Elementary entrance). Please park in the parking lot – NOT the loop or the student drop off area. Please arrive around or before 2:00, we will be locking the exterior doors (for our safety) a little bit after 2:00.

craftredo

Don’t forget: There will be a table set out if you would like to display a flyer/brochure of what you do. Are you an exercise instructor, product consultant, the head of an organization? Bring a brochure or flyer to display on the table.

ribbon star


October Craft Class – Tiered Serving Tower October 8, 2013

PLATTER 1

Ever wanted to turn those china dishes in your cabinet into something you may ACTUALLY use, but didn’t dare repurpose your grandmother’s coveted china? Well . . . don’t worry, we bought somebody else’s grandmother’s china for you to use during this craft session.

These Serving Towers will be an amazing center piece to your Holiday feast, a fantastically thought-provoking hostess gift or a useful teacher appreciation gift. Many different materials will be offered to choose from: vintage china, glass platters, aluminum serving trays, and more. We will also incorporate a secret repurposed how-to craft that will make gift giving fun, easy and recycle-e this Holiday Season.

craftredo

Craft class is THIS Sunday, October 13th
2:00pm – 4:00pm
Brandon Elementary Art Room (Martin Public School) 1619 University Street; Martin, Michigan 49070.

craftredo

Register no later than THIS Friday 4:00pm, October 11th (we will be shopping for supplies on Saturday).

craftredo

To register, send us an email at: craftredo@aol.comPLATTER 2

craftredo

Cost for the session is $20 per person. Please bring payment to the craft class. All supplies will be provided by Katie and Korene.

craftredo

Feel free to bring your own treats and drinks. No alcoholic beverages, please.

craftredo

We ask that we keep the session for adults only (no kids please). Teens 13 and up are welcome to attend, but must be accompanied by a paid adult. Feel free to invite friends.

craftredo

Here’s a link for the directions to the school: http://www.martinpublicschools.org/schools/brandonel/directions

craftredo

Enter through the main entrance on the West side of the building (Elementary entrance). Please park in the parking lot – NOT the loop or the student drop off area. Please arrive around or before 2:00, we will be locking the exterior doors (for our safety) a little bit after 2:00.

craftredo

Don’t forget: There will be a table set out if you would like to display a flyer/brochure of what you do. Are you an exercise instructor, product consultant, the head of an organization? Bring a brochure or flyer to display on the table.

PLATTER 3PLATTER 4


September Craft Class – Fall Burlap Board w/ Burlap Flower Embellishments September 24, 2013

craftredo

craftredoGLAM FULL 009

Crafters will learn many new and exciting techniques during the session. Techniques include:

  • Rustic crackle paint technique (using a household item that most everyone has on hand)
  • Transferring letters onto burlap
  • Creating burlap flowers (they are amazingly fun to make)

craftredo

Craft class is THIS Sunday, September 29th
2:00pm – 4:00pm
Brandon Elementary Art Room (Martin Public School) 1619 University Street; Martin, Michigan 49070.

craftredo

Register no later than Thursday night, September 26th (we will be shopping for supplies on Friday).

craftredo

To register, send us an email at: craftredo@aol.com

craftredo

Cost for the session is $20 per person. Please bring payment to the craft class. All supplies will be provided by Katie and Korene.GLAM FLOWERS 012

craftredo

Feel free to bring your own treats and drinks. No alcoholic beverages, please.

craftredo

We ask that we keep the session for adults only (no kids please). Teens 13 and up are welcome to attend, but must be accompanied by a paid adult. Feel free to invite friends.

craftredo

Here’s a link for the directions to the school: http://www.martinpublicschools.org/schools/brandonel/directions

craftredo

Enter through the main entrance on the West side of the building (Elementary entrance). Please park in the parking lot – NOT the loop or the student drop off area. Please arrive around or before 2:00, we will be locking the exterior doors (for our safety) a little bit after 2:00.

craftredo

Don’t forget: There will be a table set out if you would like to display a flyer/brochure of what you do. Are you an exercise instructor, product consultant, the head of an organization? Bring a brochure or flyer to display on the table.


Concrete Letter With Stamped Washer Embellishment August 20, 2013

craftredo

Jute String V

Black String V

What are 2 creative gals encouraged to do with an upcoming summer jam-packed with 8 graduation parties, 4 showers and 2 weddings? Well . . . they get craftin’, cement V jute of course!

We really wanted to ensure our gifts were hand-crafted and heartfelt since each recipient is so dear to us.

We bounced around the idea of personalization, it appears to be the trend currently – monograms, items with names, etc. Here’s what we came up with for 2 of the wedding shower gifts.

craftredo

You will need:

  • Discarded cereal or cracker/snack boxes
  • Cutting materials – scissors, Exacto knife
  • Cutting mat
  • Various tapes – blue painter’s tape and duct tape
  • Ruler
  • Pencil
  • Computer print out of a letter (we recommend staying within the size of an 8 1/2″ x 11″ paper)
  • Pen
  • Quick-setting cement (There’s 2 quick-setting formulas that we have used and they come in different colored bags. The red bag: http://www.quikrete.com/ProductLines/FastSettingConcreteMix.asp is a quicker setting formula. The mix tends to be creamier (when water is added) and the end product appears to be smoother. The yellow bag: http://www.quikrete.com/ProductLines/ConcreteMix.asp sets quick as well, but not as quick as the red bag. The mix is more chunky/rocky (when water is added) and the end product, when not tapped enough, can offer a more rustic look by producing a honey-comb effect.)
  • Discarded container, mixing device & larger spoon (we used a plastic ice cream bucket, paint stirrer & serving spoon from a project that had gone all wrong)
  • Measuring cup (Please dedicate measuring cup to craft projects. After using measuring cup, do NOT use with foods/items that will be consumed by humans or animals!!!)
  • Water
  • Wire (We used a 1/16″ wire that was found in one of our garages. You could use a coat hanger too. Do some snoopin’, use what you have.)
  • Wire cutters (use safety glasses when cutting wire)
  • Corrugated cardboard

craftredocement V blk

The supply list and instructions for the Stamped Washer Embellishment can be found at our post ‘Stamped Washer Craft’:

http://craftredo.com/2013/07/10/stamped-washer-craft/

craftredo

Directions:

  1. Print out desired letter from computer (On the computer, you may need to adjust the horizontal scale of the letter to achieve desired letter form.) Flip paper over, with a pencil color on the backside of the paper where the imprint of the letter appears. It may help to tape paper onto a window so you can see the letter shape.
  2. Flip paper back over (to the front) and tape onto inside (brown) side of the box. With the letter, you will be working in reverse. So when you face the bottom of the finished mold towards you, the letter will look correct. Trace over letter with a sturdy pen. When paper is lifted, you will see the letter imprinted onto box. Cut out letter.
  3. Trim out 1″ long strips from box. The strips will be used for the walls of the mold.
  4. Flip letter over so the printed side of the box will be the insides of the mold. We found that the printed side of the box is coated which slows down the process of water seeping into the cardboard mold. With duct tape, attach the 1″ strips onto the sides of the letter (make sure printed side of box will be on the inside of the mold). Be generous with the duct tape, seal all edges with it. It’s not gonna look pretty. You don’t want the cement to ooze out, so seal all areas. You have just created the mold for the cement.
  5. Mark 1/4″ and 1/2″ marks on a couple of the walls of the mold. This will help you monitor the amount of cement to pour into the mold.
  6. Grab the wire, bend it to fit the shape of the mold. Trim ends. (When pouring the concrete, you will lay the wire inside the mold. This will help bond the concrete together, making the piece more sturdy. (Korene’s husband was a concrete foreman, we had much help with this project. Thank you John. We will explain more later on)
  7. Mixing the quick-setting cement: We have a very odd ratio, 6 cups of Quikrete® to roughly 1 1/4 cups water filled 2 letter ‘B’s & 1 letter ‘S’. It’s very scientific, trust us (Ha! Ha!). You don’t want the mud (that’s lingo for ‘wet cement’) to be too wet or too dry. Our best explanation is it looks like oversized oatmeal (the kind you would get at a restaurant)?? Reference the photo in the slide show. Stir mixture in ice cream bucket, mixing with paint stirrer.
  8. Lay letter mold on corrugated cardboard – if you need to move the piece, you will have a means to pick it up and transport it. Use the larger spoon to gently ‘spoon in’ the cement. Pour enough cement to fill ONLY up to the 1/4″ mark. Lightly tap mold to get cement to fill-in all areas (shift the cardboard underneath). Gently lay in wire shape, do not push the wire shape down. Rest wire onto the cement. Continue to fill the mold with the remainder of concrete up to the 1/2″ mark (you will be pouring the remainder of the concrete on top of wire shape). Shift the cardboard underneath, this will help get out the air bubbles. We also gingerly raised up the cardboard (with letter on cardboard) and carefully dropped onto floor. Be extremely careful, you don’t want to be too rough (Don’t do this process too much). Try not to fill concrete past the 1/2″ mark – we noticed the molds started to warp and/or ‘blow out’. If edges start to bow out, back off on the concrete. Grab some boards and brace the mold if bowing starts. Allow concrete to set overnight.
  9. The next day, GENTLY remove cardboard (Be careful, we’ve busted many letters being too eager to rip off the cardboard). Letter may need to set out in order to fully cure. Do NOT lay in direct sunlight. This can cause the piece to dry too fast and crack. It’s best to allow the letter to dry slowly in a shaded area. Doing so will make the piece stronger.
  10. Decorate with jute string and washer embellishment.

Note: Hangers may be added during pouring process or after project has been fully cured. When you have poured the concrete to the 1/2″ mark, slightly insert hanger into the wet cement (you can use a mirror hanger or create your own hanger from wire). We’ve also attached hangers to the back of the piece after it has been fully cured with a cement caulk.

Another Note: You CAN use store bought paper mache letters for the mold, by trimming off one side of the letter. We wanted our craft to use repurposed materials and to create our own style of letters.

craftredo

How-To Slideshow

This slideshow requires JavaScript.

craftredo

craftredcraftredo

Class Slideshow

This slideshow requires JavaScript.


August Craft Class – Concrete Letter w/ Stamped Washer Embellishment August 2, 2013

cement V jute

craftredo

Crafters will create a concrete letter and have the opportunity to create a stamped washer embellishment.

craftredo

Craft class is THURSDAY, August 15th (Note: DAY CHANGE, NOT SUNDAY)
6:00pm – 8:00pm
Brandon Elementary Art Room (Martin Public School) 1619 University Street; Martin, Michigan 49070. We are waiting for final approval on location (Korene turned in the paperwork late). Don’t foresee any problems, but wanted to give you a ‘heads up’ in case of location change.

craftredo

Register no later than Friday, August 9th. Email us 2 letters that you would like to use at: craftredo@aol.com by Friday, August 9th (IE: I would like to use the letters V & K). We will provide letter templates at the class (that’s why we need to know which letters you would like to use). Crafters will use the letter template to create a mold for the concrete. The mold will be constructed from cereal boxes! It’s amazing and . . . yes, using a material that is repurposed. Gotta love that!

If you happen to have a HAMMER, bring it. We will have some available to use. Please put your name on the hammer.

craftredo

To register, send us an email at: craftredo@aol.com

craftredo

Cost for the session is $20 per person. Please bring payment to the craft class. All supplies will be provided by Katie and Korene.

craftredo

Feel free to bring your own treats and drinks. No alcoholic beverages, please.

craftredo

We ask that we keep the session for adults only (no kids please). Teens 13 and up are welcome to attend, but must be accompanied by a paid adult. Feel free to invite friends.

craftredo

Here’s a link for the directions to the school: http://www.martinpublicschools.org/schools/brandonel/directions

craftredo

Enter through the main entrance on the West side of the building (Elementary entrance). Please park in the parking lot – NOT the loop or the student drop off area. Please arrive around or before 6:00, we will be locking the exterior doors (for our safety) a little bit after 6:00.

craftredo

Don’t forget: There will be a table set out if you would like to display a flyer/brochure of what you do. Are you an exercise instructor, product consultant, the head of an organization? Bring a brochure or flyer to display on the table.


Patriotic Quote Sign – Praise And Coffee The Magazine July 10, 2013


Thank you Praise And Coffee for allowing us to feature an article in their magazine. Here’s the link: http://issuu.com/praiseandcoffee/docs/summer_2013/50?e=1741187%2F3985515


We love the distressed look. The more grungy, dirty, rusty, worn and faded an object is . . . the better. We have easy instructions for creating your very own rustic qu

ote sign. The great part is you probably have most of the items already.Glam Patriotic 0171SMALL

CRAFTREDO

CRAFTREDO

CRAFTREDO

You will need:

  • Weathered wood roughly cut to the size you need (Our wood was from old skids. We had 2 different widths, 5 1/2” and 3 1/4”). Check out the post ‘Wood and Ribbon Cross Craft – Praise and Coffee the Magazine’ for tips on collecting weathered wood.
  • Brown paper bag
  • Acrylic paint – Do you happen to have 1/2 of a gallon of paint from when you decided to repaint your bedroom light blue or the living room taupe? Go grab that. Use what you have.
  • Sharpie markers or white paint pen (if you are using a light color for the background of the board you will need a dark colored Sharpie. If you will be using a darker color for your background (navy, black, red, etc) you will need to use the white paint pen)
  • Various tapes – For this project, we used blue tape and clear tape
  • Sand paper or sanding block (Various grits – You may find that light-weight grits work best)
  • Jute string
  • Screw eyes
  • Drill
  • Pencil
  • Paint brush
  • Scissors
  • Red or blue ink pen
  • Computer print out of quote

CRAFTREDO

CRAFTREDO

CRAFTREDO

Directions:

  1. Trim the weathered wood to desired size. Crinkle up brown paper bag, lightly ‘sand’ board with brown paper bag. (It may be a good idea to use protective gloves so you won’t get a sliver.) You want to get the dirt, debris and frayed wood off of the board, without losing the integrity of the weathered wood. By using the brown paper bag, it lightly sands and gets all the stray pieces of fibers off the board.
  2. Lightly paint one side of the board. Do not paint the surface entirely – Have the paint ‘feather out’ to the edges, exposing the weathered wood texture.
  3. Print out your favorite quote from your computer. Helpful tip: On your computer, create a file the size of your board, place type into the file, print it out as ‘tiles’. Tape printouts onto a window to help line up the type, tape printouts together. It’s A-O.K. if printouts overlap.
  4. To transfer words onto the board – Turn printout over and cover the backs of the letters with graphite from the pencil. Hold paper up to the light to make sure you are getting all the parts of the letters covered with graphite.
  5. Tape quote printout onto board with blue painter tape.
  6. Trace the outer edges of the letters with a blue or red pen. By using the blue or red pen, you will be able to see the areas you have traced and the areas you have not traced. When done tracing do NOT take paper totally off, leave it attached at the top. Carefully lift paper up to ensure you have transferred over all of the parts of the letters. You may need to place the paper  back down onto the board to trace areas you’ve missed. Helpful tip: If you are using a really dark background and are finding out that the graphite from the pencil is hard to see – Try using a colored white pencil or chalk instead of the graphite.
  7. With the Sharpie (or white paint pen) simply color in your letters. Yes, it’s THAT simple.
  8. Allow letters to fully dry. Letting the letters dry overnight is best, but usually we don’t have that type of patience so we get out the hair dryer.
  9. With a sanding block or sand paper, lightly sand the letters and background. It’s awesome to see. The board will start to ‘distress’ right before your eyes.
  10. Grab the drill and drill 2 holes on the top edge of the board – This is how you’ll hang the board. We drilled holes about 2-3 inches from each end. Screw in screw eyes. You may need to use a random nail to help twist in the screw eyes. Don’t screw in the eyes all the way, they may break. Be careful when drilling your holes and screwing in the eyes – We’ve ‘lost’ many bits and eyes, they break right off in the wood, if you’re not careful. If you’re using wood from a skid, it will more than likely be a hard wood which can cause the bits and eyes to break off if the items are forced into the wood. If that does happen, move over a bit and re-drill. It just adds to the character.
  11. Tie one end of the jute string to an eye. Leave about 2 inches of tail. We fray the ends of the tail, which adds to the distressed charm. Stretch out string to the other screw eye, tie-off (leaving a tail) & trim, fray tail.

craftredo

There you go! You’re a distressed board-making rock star!

CRAFTREDO

CRAFTREDO

CRAFTREDOHow

How-To

This slideshow requires JavaScript.

CRAFTREDO

CRAFTREDO

CRAFTREDO

Photos from our ‘quote sign’ craft class session.

This slideshow requires JavaScript.


Valentine Craft June 5, 2013

craftredo

craftredo

Our Valentine Craft Session was a success!FIRST SHOT 100_3076

CRAFTREDO

craftredo

The great thing about this craft is you can give the craft all year round. My youngest son gave it to his teacher for a Christmas present. His teacher currently still displays the heart board in her entryway.

CRAFTREDO

For a full ‘run down’ on how to craft this lovely project, reference:

Wood and Ribbon Cross Craft – Praise and Coffee the Magazine

CRAFTREDO

You’ll need to download the heart template:

HEART TEMPLATE

On the template you will notice black and gray dots. We generally use the black dots, if you are reducing or enlarging the project you may find a different dot works better for your project. We wanted to offer other solutions for dot placement.

craftredo

craftredo

craftredo

craftredoedocraftredo

VK100_3048

craftredo

craftredo

craftredo

craftredo

craftredo

craftredo

craftredo

craftredo

craftredo

craftredo

craftredo

craftredo

craftredo

craftredo

craftredo

craftredo

Here’s a slide show of the class.

This slideshow requires JavaScript.


April Craft Class April 20, 2013

Rustic Quote Signsign 3202

Katie and Korene will show crafters how to create their very own custom rustic-looking quote sign.

Sunday, April 28th
2:00pm – 4:00pm
Brandon Elementary Art Room (Martin Public School) 1619 University Street; Martin, Michigan 49070

Register no later than Thursday, April 25th. Have a favorite quote you would like to use? Email quote to craftredo@aol.com by THURSDAY, APRIL 25th (keep quote to no more than 7 words). We will provide quotes to choose from if we don’t receive your quote by the 25th.

To register, send us an email at: craftredo@aol.com
Cost for the session is $20 per person. Please bring payment to the craft class. All supplies will be provided by Katie and Korene.

Feel free to bring your own treats and drinks. No alcoholic beverages, please.

We ask that we keep the session for adults only (no kids please). Teens 13 and up are welcome to attend, but must be accompanied by a paid adult. Feel free to invite friends.

If you happen to have a hair dryer, bring it. We will have some available to use – but if you can bring your own dryer, feel free to do so.

Here’s a link for the directions to the school: http://www.martinpublicschools.org/schools/brandonel/directions
Enter through the main entrance on the West side of the building (Elementary entrance). Please park in the parking lot – NOT the loop or the student drop off area. Please arrive around or before 2:00, we will be locking the exterior doors (for our safety) a little bit after 2:00.

Don’t forget: There will be a table set out if you would like to display a flyer/brochure of what you do. Are you an exercise instructor, writer of a magazine, the head of an organization? Bring a brochure or flyer to display on the table.

craftredo

craftredo

Want to order a quote sign. Email us at craftredo@aol.com


March Craft Session March 16, 2013

chalk glam 3154
Custom-Colored Chalkboard Paint

Katie and Korene will show crafters how to create their very own custom-colored chalkboard paint. Crafters will also have the opportunity to use the paint on 4 surfaces (provided by Katie & Korene): wood, metal, glass, cardboard.

Sunday, March 24th
2:00pm – 4:00pm
Brandon Elementary Art Room (Martin Public School) 1619 University Street; Martin, Michigan 49070
Register no later than Thursday, March 21st.
To register, send us an email at: craftredo@aol.com
Cost for the session is $20 per person. Please bring payment to the craft class. All supplies will be provided by Katie and Korene.

Feel free to bring your own treats and drinks. No alcoholic beverages, please.

We ask that we keep the session for adults only (no kids please). Teens 13 and up are welcome to attend, but must be accompanied by a paid adult. Feel free to invite friends.

If you happen to have a hair dryer, bring it. We will have some available to use – but if you can bring your own dryer, feel free to do so.

Here’s a link for the directions to the school: http://www.martinpublicschools.org/schools/brandonel/directions
Enter through the main entrance on the West side of the building (Elementary entrance). Please park in the parking lot – NOT the loop or the student drop off area.

Don’t forget: There will be a table set out if you would like to display a flyer/brochure of what you do. Are you an exercise instructor, writer of a magazine, the head of an organization? Bring a brochure or flyer to display on the table.

chalk close