craftredo
The Photo Transfer Class was a huge success! We had 18 brave participants. Everyone’s projects were beautiful and unique. In the beginning of our class, Korene made everyone pledge to not be disappointed if their projects did not turn out perfect. This is not a 100% photographic technique, rather a semi-rustic technique.
craftredo
craftredo
You will need:
- Wood (cut to desired size)
- Sand Paper – coarse and fine grain
- Photo printed with Inkjet printer on general purpose paper (image must be mirrored)
- Gel Gloss Medium
- Paint Brush
- Roller
- Washcloth
- Mod Podge®
- Soft cloth (we use baby socks)
- Scissors
craftredo
craftredo
Directions:
1. Prepare wood – We used a 1×8, 6 foot untreated common pine (construction grade) for our project. We found this species works well and the price fit our budget. Select pine works better, but it’s a bit pricey (over double the cost). Choose a board with minimal knots, without heavy grooves, etc. Cut wood to desired size.
craftredo
2. Prepare photo on your computer or have it printed out at an office supply store. Make sure the photo you are using is high resolution. If it doesn’t look ‘pretty’ on your computer screen it won’t get any better when you print it out. In a photo program, you may want to increase the contrast of the image (the more you work with your computer and printer, the more familiar you will be with the outcome). By adjusting the contrast, details in your photo will be more prominent (this step isn’t required). When printing out your photo – you’ll need to ‘mirror’ the image. This step is necessary. The photo printed out on paper needs to be mirrored so photo turns out the correct way when you transfer it onto your board. It’s similar to a transfer that would be printed onto a T-shirt, where the imagery is in reverse. Size photo to fit your cut wood piece (photo hung slightly off the edge about 1/8 inch on all sides). Print prepared photo on general purpose paper. Trim out photo.
craftredo
3. Sand sides, face and back of wood piece. Start with a coarse grit paper and then move to the fine grit to get a nice smooth surface. Sand wood with the grain, don’t go cross-grain you’ll get scratches in the wood. Wipe board with soft cloth (we like to use baby socks or whatever discarded cloth we have around the house) to remove any sanding dust and debris.
craftredo
4. Applying photo to board – Decide which side of the board should be the image transfer side (pick the best looking side). With a paint brush, apply Gel Gloss Medium to the top of board. Use enough Gel Gloss Medium to liberally ‘paint’ the board. Do not leave any dry spots, but making sure not to use too much. Place printed picture face down on your prepared board. Be very careful to line it up correctly. Do not fuss with your photo once it is down on the board. Leave it wear it lands!
craftredo
5. Gently press the photo onto the board using your hands. Using a roller, gently roll over the photo. There may be a few wrinkles. Do not over roll, excessive rolling may cause the paper to lift off (which is not good). Just go back and forth a few times with the roller to make sure the image is adhered to the board as evenly as possible. Wipe off excess Gel Gloss Medium that may have squirted out the sides.
craftredo
6. Now it is time to let your project dry for 24 hours. Do not go back and peak at it to see how it’s doing. Leave it alone, walk away.
craftredo
7. Removing paper from board – After board has dried for 24 hours, get ready to see your results. Wet the wash cloth (not dripping, not totally wringed out). Lay the wet washcloth over the entire board. Lightly press down over the board with your hands to wet the surface. When you lift your washcloth you will see the image is now darker (and getting wet). Check for any spots that didn’t seem to absorb the water (they will look white still) dab these spots with a little bit of water and let it set so the water can get absorbed into the ‘troubled spot’, it will start to turn dark.
craftredo
8. Once your paper is wet, you are ready to remove the paper. Use your fingers and gently rub/burnish across your board. Paper pulp will start to roll up. Continue this process until you have removed as much paper as possible from the board. Be sure to keep the board wet while you are rubbing/burnishing, this will make the process easier. Do not rub too hard or you may rub all the detail off the board. Go over board one last time with wet washcloth to remove pulp residue.
craftredo
9. Allow board to dry. We used fans and had dry boards within 15 minutes. You will notice that the colors of your photo will fade as your board dries. Not to worry! When you add a sealer to the board, the colors will look as they did when the board was wet.
craftredo
10. After your board is fully dried, use sandpaper to sand the edges of board. For example, you may want to remove some of the photo from the corners for a more rustic look. Remove any sanding debris with a soft cloth. (At this point, sometimes we paint the sides and back of the board with black acrylic paint.) Apply Mod Podge to the top surface and sides of board. We prefer Gloss Mod Podge, colors appear to pop more with the gloss.
craftredo
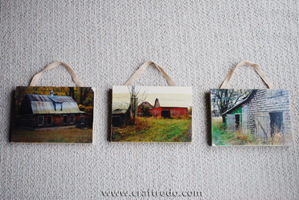
11. Displaying your board – Your board can be finished at this point, or you can choose to add a hanging method. We have used a traditional ‘D’ hook/strap (string ribbon through ‘D’ hook/strap and hang board from ribbon) and saw toothed hangers (both found at your local hardware store). Upholstery nails and ribbon will also work. Poke the upholstery nail through the ribbon, hammer nail onto back of board. Be crafty, hang or prop it any way you wish!
craftredo
craftredo
Crafters Note: Inkjet prints VS LaserJet prints. We’ve used both. The LaserJet prints – end product may have a bit more detail, but they’re a bit more costly (plus you have to plan a trip to the office supply store). We like to keep crafts cheap so we mostly use our Inkjet printouts since we have them in our homes. Hey, it’s a rustic technique, if you want something 100% photographic just have a photograph made. Just don’t get discouraged if the project doesn’t turn out the first time. We’ve had to redo projects 3 times. Experiment, you’ll be amazed at what you discover.
craftredo
craftredo
This slideshow requires JavaScript.
 craftredo