![]()
craftredo
We had many requests for a craft class regarding a recycled bottle cap craft. The class was held this past January and we crafted up a storm. We incorporated a message board created from the backside of a cookie sheet.
You’ll find many uses for the bottle cap craft – a surprise birthday greeting to send through the mail, a quick and easy ‘Thank You’ to craft up , holiday themed magnets, necklaces, etc. This is a great craft for kiddos too.
craftredo
craftredo
You will need:
- Bottle caps
- Scrapbook papers
- Scrapbook embellishments (glitter, buttons, stickers, brads, glitter glue, rhinestones, pearls, themed confetti, plastic letters, etc)
- Magazines, discarded books, cards
- Ribbon
- Mod Podge
- 1” circle hole punch or a circle template
- Scissors
- Exacto knife
- Cutting board
- Ruler
- Tapes (optional – regular and double sided sticky tape)
- Cookie sheet
- 2 part epoxy
- Button magnets
- Hot glue gun and/or heavy duty adhesive (our favorite is E-6000)
- Drill
craftredo
craftredo
Directions For Bottle Cap:
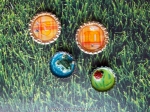
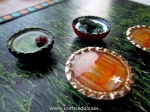
- With your 1” circle punch (or circle template) cut out paper for the background of your design. Adhere paper onto the inside of the bottle cap with either Mod Podge or double sided sticky tape. Helpful Tip: Don’t worry too much about taking out the little plastic disc that’s on the inside of the bottle cap. You CAN get it out using a knife, pliers or the heat of a hair dryer. We found that the end product really didn’t change much with the disc in or taken out – but you can give yourself a pretty bad wound trying to get that outta there. So, leave it in.
- Decorate the inside. Get creative – use words from magazines, pictures from children’s books, special notes and sentiments, a scrap of fabric that brings back a memory. They’re actually quite fun to decorate. Results are quick. It’s like a miniature canvas, a diorama. That’s probably why kids enjoy creating these.
- Coat the decorated inside with a layer of Mod Podge. Let dry over night.
- To apply the 2-part epoxy check out our post ‘A Spoon Full Of Sweet Sentiments’ dated July 19, 2012: http://craftredo.com/2012/07/19/a-spoon-full-of-sweet-sentiments/ You’ll find step-by-step instructions plus a supply list.
- After epoxy has fully dried, attach button magnet onto the back of the bottle cap with hot glue or E-6000.
craftredo
craftredo
Directions For Message Board:
- Drill 2 holes on the rim of the cookie sheet. We used 1/4” bit. Be sure to take a nail and make an indent before you start drilling. This is called a ‘tap’, it will help your drill not go so ‘squirrely’ when you’re drilling. Remove sharp edges with a file, wire brush attachment on your drill, or grinder.
- Determine your design for your board. We used scrap book paper in various colors/patterns. The sky’s the limit. You may want a simple single color pallet, or go crazy with multiple colors and patterns. Decide if you want a ribbon to help make the transition between paper pieces and choose that if applicable. You may just want to transition with fancy pattern scissors or even cut a scallop pattern freehand.
- Once you have chosen your materials for your board it is time to cut the paper to fit your cookie sheet. We experimented with many methods of cutting the paper. We found using a cutting mat, straight edge, and exacto blade to be the easiest way for us, but scissors worked fine as well. If you are using multiple pieces, let them overlap a bit. You can hide the transition with a ribbon and it is easier than trying to get them to line up exactly.
- After your pieces are cut to size you may want to hold them together with a bit of tape on the back side. Then you are ready to adhere the paper to your cookie sheet. Apply a thin layer of Mod Podge to your cookie sheet. Place your paper on your sheet and make sure it is lined up the way you want it. Rub gently with your hands to remove any bubbles. If you get a stubborn bubble, just let it be. It may settle after the Mod Podge dries. Adhere any ribbon you are using with Mod Podge. Next, apply a thin layer of Mod Podge to the top of the paper and ribbon. We applied with brushes, but we suggest using your hands to smooth it out if you want to try and avoid brush strokes.
- Allow your Message Board to dry, then add desired ribbon through the drilled holes for hanging. We added small containers to some of our projects for an added bonus. Check your recycle bin. A tomato paste can works well for holding pencils or markers. A discarded juice packet box (the little packets that you add to bottled water to make it flavored) makes a great box to hold ‘chore slips’. Simply cover your container with your favorite paper and Mod Podge. Allow to dry and add magnets. Have fun with your new Message Board!
Helpful Tip: We live in Michigan, which tends to be quite humid, and we found that the gloss Mod Podge can have a tendency to be sticky even after it has fully dried. For the final protective coat over the scrapbook paper (on the message center) – we recommend using the matte Mod Podge, referencing the Mod Podge label for manufactures recommendation, or not to use anything for the top coat.
craftredo
craftredo
Other gift ideas for this craft.
craftredo
-
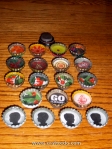
- Seasonal magnets made with vintage wrapping paper, school spirit magnets, silhouette magnets, use images from old Christmas cards . . .
-

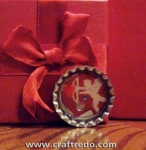
- Birthday greetings sent through the mail.
-
- Valentine imagery clipped from a magazine.
-
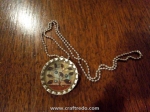
- Necklace front.
-

- Necklace back.
-

- Message center chore slips. Assign each child their own slip color.
-
- Use scrap booking embellishments.
-
- Make dimensional magnets.
-
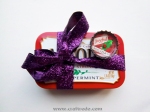
- Christmas gift – great for teacher, co-worker, etc.
-

- Valentine treats made by a 5 year old.
-
- A thoughtful ‘Thank You’ gift.
craftredo
craftredo
‘How To’ and craft class photos.